Melanjutkan part 1 sebelumnya tentang membuat rest api dengan lumen, kali ini kita akan melanjutkan rest api sebelumnya dengan menambahkan authentication melalui token. Dimana kita akan menggunakan sebuah Library yaitu JWT Auth.
Tutorial ini adalah lanjutan dari part sebelumnya, jadi silakan baca dulu part sebelumnya supaya tidak bingung disini: Membuat REST API dengan Lumen #part 1
- Install JWT Auth Package
Daftar Isi
Cara mudah saja, buka terminal dan jalankan command ini:
composer require tymon/jwt-auth:1.0.0-beta.3
Tunggu sampai proses install selesai.
Setelah itu buka file boostrap/app.php dan tambahkan sebuah service provider baru
$app->register(TymonJWTAuthProvidersLumenServiceProvider::class);
Enable $app->withEloquent(); dengan men uncomment
Tambahkan midleware baru untuk jwt auth
$app->routeMiddleware([
    'auth' => AppHttpMiddlewareAuthenticate::class,
    'jwt.auth' => TymonJWTAuthMiddlewareGetUserFromToken::class,
]);
Selanjutnya kita harus membuat sebuah secret untuk generate token nanti. Jalankan perintah di bawah ini:
php artisan jwt:secret
- Buat Config File
Buat sebauh file dengan nama auth.php di dalam folder config, lalu isi dengan file dibawah ini
<?php
return [
    /*
    |--------------------------------------------------------------------------
    | Authentication Defaults
    |--------------------------------------------------------------------------
    |
    | This option controls the default authentication "guard" and password
    | reset options for your application. You may change these defaults
    | as required, but they're a perfect start for most applications.
    |
    */
    'defaults' => [
        'guard' => env('AUTH_GUARD', 'api'),
        'passwords' => 'users',
    ],
    /*
    |--------------------------------------------------------------------------
    | Authentication Guards
    |--------------------------------------------------------------------------
    |
    | Next, you may define every authentication guard for your application.
    | Of course, a great default configuration has been defined for you
    | here which uses session storage and the Eloquent user provider.
    |
    | All authentication drivers have a user provider. This defines how the
    | users are actually retrieved out of your database or other storage
    | mechanisms used by this application to persist your user's data.
    |
    | Supported: "session", "token"
    |
    */
    'guards' => [
        'api' => [
            'driver' => 'jwt',
            'provider' => 'users',
        ],
    ],
    /*
    |--------------------------------------------------------------------------
    | User Providers
    |--------------------------------------------------------------------------
    |
    | All authentication drivers have a user provider. This defines how the
    | users are actually retrieved out of your database or other storage
    | mechanisms used by this application to persist your user's data.
    |
    | If you have multiple user tables or models you may configure multiple
    | sources which represent each model / table. These sources may then
    | be assigned to any extra authentication guards you have defined.
    |
    | Supported: "database", "eloquent"
    |
    */
    'providers' => [
        'users' => [
            'driver' => 'eloquent',
            'model' => AppUser::class,
        ],
    ],
    /*
    |--------------------------------------------------------------------------
    | Resetting Passwords
    |--------------------------------------------------------------------------
    |
    | You may specify multiple password reset configurations if you have more
    | than one user table or model in the application and you want to have
    | separate password reset settings based on the specific user types.
    |
    | The expire time is the number of minutes that the reset token should be
    | considered valid. This security feature keeps tokens short-lived so
    | they have less time to be guessed. You may change this as needed.
    |
    */
    'passwords' => [
        'users' => [
            'provider' => 'users',
            'table' => 'password_resets',
            'expire' => 60,
        ],
    ],
]
Buat file config baru lagi dengan nama jwt.php di dalam folder config dan isi file dengan kode di bawah ini:
<?php
return [
    /*
    |--------------------------------------------------------------------------
    | JWT Authentication Secret
    |--------------------------------------------------------------------------
    |
    | Don't forget to set this in your .env file, as it will be used to sign
    | your tokens. A helper command is provided for this:
    | `php artisan jwt:secret`
    |
    | Note: This will be used for Symmetric algorithms only (HMAC),
    | since RSA and ECDSA use a private/public key combo (See below).
    |
    */
    'secret' => env('JWT_SECRET'),
    /*
    |--------------------------------------------------------------------------
    | JWT Authentication Keys
    |--------------------------------------------------------------------------
    |
    | What algorithm you are using, will determine whether your tokens are
    | signed with a random string (defined in `JWT_SECRET`) or using the
    | following public & private keys.
    |
    | Symmetric Algorithms:
    | HS256, HS384 & HS512 will use `JWT_SECRET`.
    |
    | Asymmetric Algorithms:
    | RS256, RS384 & RS512 / ES256, ES384 & ES512 will use the keys below.
    |
    */
    'keys' => [
        /*
        |--------------------------------------------------------------------------
        | Public Key
        |--------------------------------------------------------------------------
        |
        | A path or resource to your public key.
        |
        | E.g. 'file://path/to/public/key'
        |
        */
        'public' => env('JWT_PUBLIC_KEY'),
        /*
        |--------------------------------------------------------------------------
        | Private Key
        |--------------------------------------------------------------------------
        |
        | A path or resource to your private key.
        |
        | E.g. 'file://path/to/private/key'
        |
        */
        'private' => env('JWT_PRIVATE_KEY'),
        /*
        |--------------------------------------------------------------------------
        | Passphrase
        |--------------------------------------------------------------------------
        |
        | The passphrase for your private key. Can be null if none set.
        |
        */
        'passphrase' => env('JWT_PASSPHRASE'),
    ],
    /*
    |--------------------------------------------------------------------------
    | JWT time to live
    |--------------------------------------------------------------------------
    |
    | Specify the length of time (in minutes) that the token will be valid for.
    | Defaults to 1 hour.
    |
    | You can also set this to null, to yield a never expiring token.
    | Some people may want this behaviour for e.g. a mobile app.
    | This is not particularly recommended, so make sure you have appropriate
    | systems in place to revoke the token if necessary.
    |
    */
    'ttl' => env('JWT_TTL', 60),
    /*
    |--------------------------------------------------------------------------
    | Refresh time to live
    |--------------------------------------------------------------------------
    |
    | Specify the length of time (in minutes) that the token can be refreshed
    | within. I.E. The user can refresh their token within a 2 week window of
    | the original token being created until they must re-authenticate.
    | Defaults to 2 weeks.
    |
    | You can also set this to null, to yield an infinite refresh time.
    | Some may want this instead of never expiring tokens for e.g. a mobile app.
    | This is not particularly recommended, so make sure you have appropriate
    | systems in place to revoke the token if necessary.
    |
    */
    'refresh_ttl' => env('JWT_REFRESH_TTL', 20160),
    /*
    |--------------------------------------------------------------------------
    | JWT hashing algorithm
    |--------------------------------------------------------------------------
    |
    | Specify the hashing algorithm that will be used to sign the token.
    |
    | See here: https://github.com/namshi/jose/tree/master/src/Namshi/JOSE/Signer/OpenSSL
    | for possible values.
    |
    */
    'algo' => env('JWT_ALGO', 'HS256'),
    /*
    |--------------------------------------------------------------------------
    | Required Claims
    |--------------------------------------------------------------------------
    |
    | Specify the required claims that must exist in any token.
    | A TokenInvalidException will be thrown if any of these claims are not
    | present in the payload.
    |
    */
    'required_claims' => ['iss', 'iat', 'exp', 'nbf', 'sub', 'jti'],
    /*
    |--------------------------------------------------------------------------
    | Blacklist Enabled
    |--------------------------------------------------------------------------
    |
    | In order to invalidate tokens, you must have the blacklist enabled.
    | If you do not want or need this functionality, then set this to false.
    |
    */
    'blacklist_enabled' => env('JWT_BLACKLIST_ENABLED', true),
    /*
    | -------------------------------------------------------------------------
    | Blacklist Grace Period
    | -------------------------------------------------------------------------
    |
    | When multiple concurrent requests are made with the same JWT,
    | it is possible that some of them fail, due to token regeneration
    | on every request.
    |
    | Set grace period in seconds to prevent parallel request failure.
    |
    */
    'blacklist_grace_period' => env('JWT_BLACKLIST_GRACE_PERIOD', 0),
    /*
    |--------------------------------------------------------------------------
    | Providers
    |--------------------------------------------------------------------------
    |
    | Specify the various providers used throughout the package.
    |
    */
    'providers' => [
        /*
        |--------------------------------------------------------------------------
        | JWT Provider
        |--------------------------------------------------------------------------
        |
        | Specify the provider that is used to create and decode the tokens.
        |
        */
        'jwt' => TymonJWTAuthProvidersJWTNamshi::class,
        /*
        |--------------------------------------------------------------------------
        | Authentication Provider
        |--------------------------------------------------------------------------
        |
        | Specify the provider that is used to authenticate users.
        |
        */
        'auth' => TymonJWTAuthProvidersAuthIlluminate::class,
        /*
        |--------------------------------------------------------------------------
        | Storage Provider
        |--------------------------------------------------------------------------
        |
        | Specify the provider that is used to store tokens in the blacklist.
        |
        */
        'storage' => TymonJWTAuthProvidersStorageIlluminate::class,
    ],
];
Edit User Model
Buka file User.php yang ada di dalam folder app, dan implement JWTSubject
Jadi fungsinya agar model User dikenali oleh JWT auth.
<?php
namespace App;
use IlluminateAuthAuthenticatable;
use LaravelLumenAuthAuthorizable;
use IlluminateDatabaseEloquentModel;
use IlluminateContractsAuthAuthenticatable as AuthenticatableContract;
use IlluminateContractsAuthAccessAuthorizable as AuthorizableContract;
use TymonJWTAuthContractsJWTSubject;
class User extends Model implements AuthenticatableContract, AuthorizableContract, JWTSubject
{
    use Authenticatable, Authorizable;
    /**
     * The attributes that are mass assignable.
     *
     * @var array
     */
    protected $fillable = [
        'name', 'email',
    ];
    /**
     * The attributes excluded from the model's JSON form.
     *
     * @var array
     */
    protected $hidden = [
        'password',
    ];
     /**
     * Get the identifier that will be stored in the subject claim of the JWT.
     *
     * @return mixed
     */
    public function getJWTIdentifier()
    {
        return $this->getKey();
    }
    /**
     * Return a key value array, containing any custom claims to be added to the JWT.
     *
     * @return array
     */
    public function getJWTCustomClaims()
    {
        return [];
    }
}
Tambahkan middleware di routes.
Sekarang kita akan memproteksi routes mana yang hanya bisa di akses user jika sudah terauthentikasi.
Tambahkan middleware baru di file routes/web.php
$app->group(['middleware' => 'jwt.auth'], function () use ($app){
        $app->get('products', 'ProductController@index');
        $app->get('products/{id}', 'ProductController@show');
        $app->post('products', 'ProductController@store');
        $app->put('products/{id}', 'ProductController@update');
        $app->delete('products/{id}', 'ProductController@delete');
        $app->get('categories', 'CategoryController@index');
        $app->get('categories/{id}', 'CategoryController@show');
        $app->post('categories', 'CategoryController@store');
        $app->put('categories/{id}', 'CategoryController@update');
        $app->delete('categories/{id}', 'CategoryController@delete');
    });
Sekarang kita coba akses routes yang sudah ada di dalam middleware jwt.auth
Karena kita melakukan akses tanpa token, maka api akan memberikan respond berupa status 401 dengan pesan berupa UnauthorizedHttpException.
Ini artinya api kita sudah berhasil kita lindungi dari user yang mau mengakses tanpa login dulu.
Lalu bagaimana caranya supaya kita bisa mengakses api tersebut?
Buat AuthController
AuthController.php akan berfungsi untuk meng generate token saat user login.
<?php
namespace AppHttpControllers;
use IlluminateHttpRequest;
use TymonJWTAuthExceptionsJWTException;
use TymonJWTAuthExceptionsTokenExpiredException;
use TymonJWTAuthExceptionsTokenInvalidException;
use TymonJWTAuthJWTAuth;
class AuthController extends Controller
{
    /**
     * @var TymonJWTAuthJWTAuth
     */
    protected $jwt;
    public function __construct(JWTAuth $jwt)
    {
        $this->jwt = $jwt;
    }
    public function loginPost(Request $request)
    {
        $this->validate($request, [
            'email'    => 'required|email|max:255',
            'password' => 'required',
        ]);
        try {
            if (! $token = $this->jwt->attempt($request->only('email', 'password'))) {
                return response()->json(['user_not_found'], 404);
            }
        } catch (TokenExpiredException $e) {
            return response()->json(['token_expired'], $e->getStatusCode());
        } catch (TokenInvalidException $e) {
            return response()->json(['token_invalid'], $e->getStatusCode());
        } catch (JWTException $e) {
            return response()->json(['token_absent' => $e->getMessage()], $e->getStatusCode());
        }
        return response()->json(compact('token'));
    }
}
Setelah itu tambahkan sebuah routes baru di web.php
$app->post('/auth/login', 'AuthController@loginPost');
Jadi user yang ingin mengakses api, harus generate token dulu dengan mengakses route di atas.
Kita coba generate token lewat postman.

Nah sekarang kita sudah dapet token, selanjutnya kita bisa menggunakan token tersebut untuk mengakses route yang terproteksi tadi, seperti contoh di bawah ini.
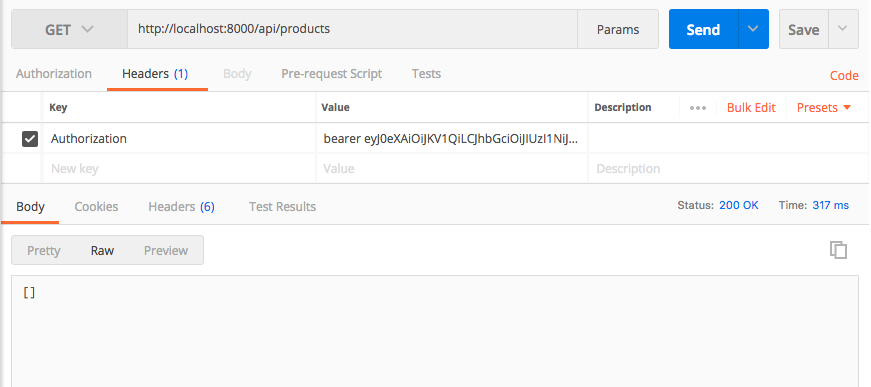
Kita harus menambahkan header baru dengan nama Authorization dengan value bearer token_kamu
Nah di implementasi pada real project, token ini bisa kamu simpan di local storage browser atau pada device smartphone kamu jadi bisa digunakan berulang kali.
Jadi itulah pemanfaatan Jwt Auth untuk salah satu cara mengamankan rest api yang kamu buat.